Efficiency with Sublime Text and Ruby
November 19, 2013What does a developer do when he likes the usability of a graphical editor like Textmate, but wants the configurability of Vim or Emacs? The answer is Sublime Text. I used to write my programs in Textmate. After seeing Sublime Text in action at a Ruby meet-up I downloaded it. Sublime Text is fast, developer sleek, and modifiable. I write Ruby everyday in Sublime Text and have learned ways to work with efficiency and precision. By sharing, I hope to save you time, effort, and energy on your next Ruby project. Tips we’re covering today are broken down into three sections:
- Navigation of your project and files.
- General hotkeys and usage.
- Some must have plugins.
Note: This guide was written with Mac OS X and ST2 in mind. Although most of what is said here SHOULD transfer pretty easily.
Prerequisite: Package Control
Package Control is a great plugin written for Sublime that allows you to easily install and manage plugins. Installation is simple. Open up the command terminal that comes with Sublime by pressing:
Control + `
Note: This is for Sublime Text 2
import urllib2,os; pf='Package Control.sublime-package'; ipp = sublime.installed_packages_path(); os.makedirs( ipp ) if not os.path.exists(ipp) else None; urllib2.install_opener( urllib2.build_opener( urllib2.ProxyHandler( ))); open( os.path.join( ipp, pf), 'wb' ).write( urllib2.urlopen( 'http://sublime.wbond.net/' +pf.replace( ' ','%20' )).read()); print( 'Please restart Sublime Text to finish installation')
Once this finishes, go ahead and restart Sublime Text. Once it has restarted, you should be able to do this:
Command + Shift + P- type in
Package - See a list of Package Control options.
We’re not going to install any packages right now, just make sure you have this installed if you plan on going through entirety of this post. Onward!
Navigation of your project and files.
First off, you should know about Command + T. This is the best way to change files in Sublime. But there’s some things that Command + T does that a few people aren’t aware of. Let’s take RSpec for example. RSpec is great for telling you where your failures are.
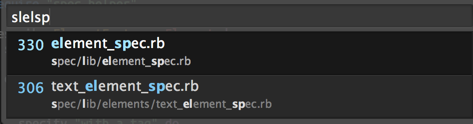
Failed examples: rspec ./spec/lib/element_spec.rb:72 # ElementFactory::Element.to_html returns an html safe string So I know from this that element_spec.rb is my failing file on line 72. Perfect. Commonly I see people go to Sublime and press Command + T followed by element_spec. This is fine but there’s room for fewer key strokes and higher precision. First off, Sublime will prioritize files based on a pretty simple convention. First letter of a word, delimited by underscores or slashes. So if we have a file located at spec/lib/element_spec.rb we can use this when going into Command + T:
slelsp
Wait what? If we look at it closely we can see the entry in the location of the file. (s)pec/(l)ib/(el)ement_(sp)ec.rb
But what about precision? We’ve reduced our keystrokes but we’re not more precise just yet. In combination to the filename entry into Command + T, you can include a line number. Remember, our problem is on line 72.
slelsp:72
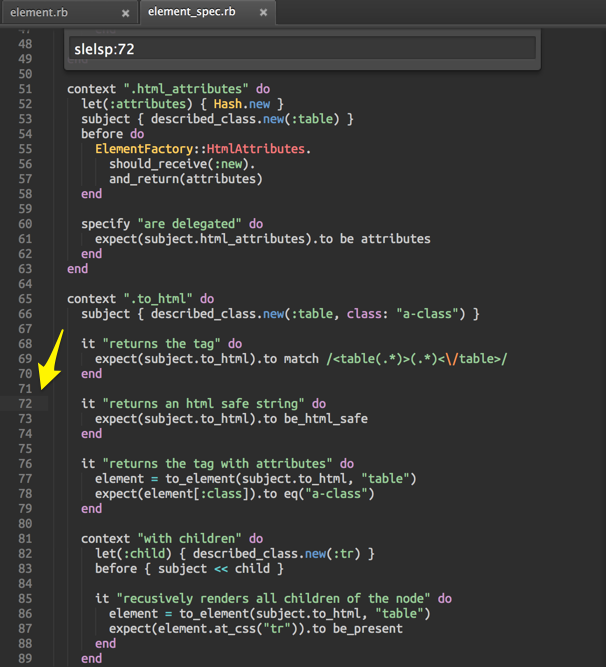
It might be a bit hard to see but line 72 is now highlighted. What happens is the first entry that is returned by Command + T is used when you start to look for a line number, i.e., :72. This can get even better actually. Let’s look at another RSpec example.
1) ElementFactory::Element.to_html returns an html safe string
   Failure/Error: subject { described_class.new(:table, class: "a-class") }
   NoMethodError:
     undefined method `[]' for nil:NilClass
   # ./lib/element_factory/element.rb:12:in `block in initialize'
The actual failure here doesn’t matter. What we care about is the last portion.
# ./lib/element_factory/element.rb:12:in `block in initialize'
We know that we could just do our awesome search like above with the line number 12. But we have more information here, which means we can get more precise. The information I’m speaking about specifically is rspec is kindly telling us which method our failing is occurring in: initialize. With that knowledge we can actually get straight to the initialize method in Command + T like so:
lefel@init
You can see the result here:

So what’s happening here is that Sublime is using the first file that matches the best for our input, lefel, which translates to lib/element_factory/element.rb. Since we know what method we’re already looking for thanks to RSpec’s output, we can attach @init to say “Go to the method init*”. You could type out the whole method but why? in probably would have worked too. Success! Moving around in Sublime is amazing when you start to get these tricks under your fingers. I understand that typing in segments is a bit weird. But my trick is I type it as fast as I say it. Basically, when I say in my head lib/element_factory/element.rb my fingers can only really hit lefel to keep pace with my mind.
Using line / method finding when the file is already open
You can use these search method when the file you care about is already open. The keys are:
Control + G– Line search (note: control)Command + R– Method search.- A note on method search: Method search is actually a great way to understand a file / class without having to scroll through as it shows you the method arguments too.
The Grass is always greener
As cool as these tricks are, and they are very cool, there is another way to move around that takes the cake. CTags. CTags in Sublime has an outside dependency. Homebrew is the simplest way to get it installed on your machine
brew install ctags
Additionally you will need the Sublime Plugin to use CTags in your project. Package Control provides a simple way to install CTags in Sublime.
Command + Shift + PPackage Install- CTags
Background
“Ctags is a programming tool that generates an index file of names found in source and header files of various programming languages. Depending on the language, functions, variables, class members, macros and so on may be indexed.” http://en.wikipedia.org/wiki/CTags Here’s a common workflow: See a class being using in another class, see a method in that class that you need to know what it’s doing. Command + T and hope it has it’s own file that followed a certain convention. It doesn’t. You shed a single tear into your lukewarm cappuccino you’ve been neglecting because of the Yak Shaving you have embarked on. Insanity lumes. Granted this is a bit exaggerated, it does happen. CTags has your back to find classes that can sometimes be buried, or really, if you just want to switch quickly. We’re going to need to create a Ruby file in order to continue. Travel to a directory that is in your $PATH and create a file called ctags_for_ruby. chmod +x ctags_for_ruby so it can be executed. For the contents of this file, slap this in and save:
#!/usr/bin/env ruby
system "find . -name '*.rb' | ctags -f .tags -L -"

if File.exist? './Gemfile'
  require 'bundler'
  paths = Bundler.load.specs.map(&:full_gem_path).join(' ')
  system "ctags -R -f .gemtags #{paths}"
end
What this file does:
- Generates a .tags file containing all of the ctags for our project
- Generates a .gemtags file that contains all of the ctags for gems contained in our Gemfile (if we have one).
The reason there’s a separate .gemtags file is because this ruby script will omit the .gemtags file in the case you aren’t using Ruby w/ Bundler. You still will get the pleasure of CTags in your project. It’s great to have the CTags for all of your 3rd party code for when you need to debug something that is occuring outside of your project. The next step is to tell our CTags plugin which command to use to generate or refresh our projects tags. The easiest way to get to your Package settings for CTags is to do the following:
Command + Shift + PPackage ListCTagsand press enter, this will open the directory for the package.- Once you’re in the directory, open the
CTags.sublime-settingsfile.
Few things:
- Replace the command with
ctags_for_ruby - Change the
extra_tag_filesto include.gemtagsand.tags
Here’s mine in the end:
{
    "debug"           :  false,
    "autocomplete": false,
    "command"   :  "ctags_for_ruby",
    "filters"         :  {
        "source.python": {"type":"^i$"}
    },
    "definition_filters": {
        "source.php": {"type":"^v$"}
    },
    "definition_current_first": true,
    "show_context_menus": true,
    "extra_tag_paths" :  [ [["source.python", "windows"], "C:\\Python27\\Lib\\tags"]],
    "extra_tag_files" : [".gemtags", ".tags"]
}
All set! (It might be worthwhile to just restart Sublime to avoid funkiness). Now when you’re in a project you can slap the keys Control + T + R to rebuild your tags file. You’ll see output below when you do this hopefully:

When this is done, you should be able to have your caret over class names and find them by pressing Control + T + T. Yes Double T. If there’s only 1 match it will immediately travel to that file + symbol. Otherwise a list will be provided:

This is extremely handy for quickly moving around. Whether you’re in a spec, or looking for a solution as to why a 3rd party gem simply isn’t doing what you expected. If you’re just looking for a symbol without the text currently present in your file, you can just use Control + TY (Press T and then Y). You’ll see a small text box appear in the bottom of Sublime.
General hotkeys and usage
By now it should be pretty apparent that even though Sublime is technically a GUI Editor, it is very hotkey heavy. You can get around pretty much everything with your keyboard. With that said there are some hotkeys that are awesomely useful but not really talked about. I’d like to share a few with some use cases. To victory!
Command + D
One of my favorites and a fairly unique tool is Command + D. This hotkey lets you select the next instance of the currently highlighted text.
Control + Shift + Arrow Up or Down
This one is great for highlighting lines that are similar but you need to change a simple thing about them. But there’s a barrier to entry. This shortcut is actually an OS shortcut as well, except it’s a dumb one. It’ll mosaic your windows at snail speed. To disable this on Mac, you’ll need to do this: System Preferences -> Keyboard -> Shortcuts. Tick off Mission Control and Application Windows. If you use this keyboard shortcut currently, it might be best that you actually just remap this shortcut in Sublime. For me this was never used so no harm no foul. But why is this useful? Gif time.

Or removing attribute accessors.

Note: Yes the second example could equally be accomplished with Command + D. Your prerogative.
Command + / (slash)
Comment out (or in) the current line (or selection).
Command + Shift + D
This hotkey will duplicate the current line or selection. This one is great for when you’re making a new initializer as seen here:
Line duplication is one that I use very frequently. I highly recommend trying to work this hotkey into your daily workflow. You’d be surprised how much you can actually use it.
Layouts
Sublime comes with layouts out of the box which is great if you have a high resolution screen. Layouts aren’t the same as tabs, but rather a group of tabs. The hotkeys for them are slightly buried so we’ll talk here about them and some good use cases for them.
To switch to a layout:
Layouts are prefixed with the Command + Option (Alt). You then choose the layout you’re looking for with a number. For example if you want to switch to a 2 column layout, the shortcut would be Command + Option (Alt) + 2. Alternatively, if you prefer a row layout, you can do finger yoga and press Command + Option + Shift + 2 to get 2 rows instead. Layouts are a great way to see a lot of code but I prefer to see 2 things in tandem almost always. My spec and my implementation. Here’s my workflow for quickly getting to that stage using the example from RSpec above where our element spec failed. My goal is to open those 2 files in my layout as quickly as possible.
Here’s what I did. I opened my spec and then my implementation and immediately switched my implementation to the second column. The hotkey run list:
Command + T– Find my specCommand + T– Find my implementationCommand + Option + 2– Switch to a 2 column layout.Control + Shift + 2– Switch the current tab to the second column.
Creating a new file with AdvancedNewFile
This hotkey requires the package “AdvancedNewFile”.
Command + Shift + PPackage InstallAdvancedNewFile
I love this plugin because creating files in Sublime is less than intuitive. I would actually say this is probably the worst thing about Sublime. This plugin picks up the slack though. The great thing about AdvancedNewFile is that it’s a great combination of mkdir -p and touch. Meaning that it doesn’t care if the directory exists or not. It’ll make it if it needs to. It comes with autocomplete and if setup correctly, file permissions as well. Using it is simple:
Command + Option (Alt) + N

Sidebar Enhancements
This hotkey (really it’s a tool) requires the package “SideBarEnhancements”.
Command + Shift + PPackage InstallSideBarEnhancements
Another annoying thing about renaming and moving files in Sublime is that out of the box you need to use your mouse… right click… find the menu item for rename, and proceed that way. Thankfully there’s a plugin called Sidebar Enhancements that gives you keyboard access as well as longer more feature filled menu for right clicking files and folders. To use it:
Command + Shift + PFile:
You’ll see a list of some really handy options for manipulating files. Rename, Move, and Delete to name a few.
My List of plugins
I’m going to dump a short list of plugins because I’ve cultivated them over 2 years now and use them daily. I hope they are of use to you.
- AdvancedNewFile – Create files regardless of directory presence.
- Alignment – Align based on equal signs
- CoffeeScript – Syntax highlighting for Coffeescript
- ColorPick – Color picker
- CTags – Described.
- Cucumber – Syntax highlighting for Gherkin
- DashDoc – Open documentation in the Dash.app for a selection
- DetectSyntax – Handy for ruby projects that include Gemfiles and Rakefiles that are technically ruby and sets the syntax highlighting for you.
- Git – Awesome way to use Git in sublime from
Command + Shift + P - GitGutter – See where your changes are in your file compared to the last commit.
- Package Control – Described.
- Ruby Hash Converter – Convert 1.8 hashes to 1.9
- ruby-slim.tmbundle – Slim syntax highlighting.
- SCSS – Sass syntax highlighting.
- SideBarEnhancements – Described.
- Solarized Color Scheme – The solarized color theme.
- SublimeREPL – Provides a REPL in Sublime for Python + Ruby.
- TrailingSpaces – Removes trailing spaces on save.
Conclusion
Sublime Text is great. It renders text extremely fast, it provides a great toolset with a vanilla install, and I’ve never had it crash on me. It’s all around a good editor. I’ve used it for a little over 2 years now and haven’t looked back or regretted not becoming a Vim user. Just remember your tools don’t make great software or you a great developer. You’re in charge of that.